 Oosawa 4D Volume Viewer (ver.0.790)
Japanese

The aim of Oosawa is to visualize 3D/4D volume data, and to make high quality movies from data.
For that purpose, Oosawa adopted timeline-based GUI, to edit visualization parameters and cameraworks.
Also, Oosawa can export scene files for Pov-Ray (.pov), so that you can make images or movies using ray-tracing method (if you have a lot of patience to wait the rendering time.)
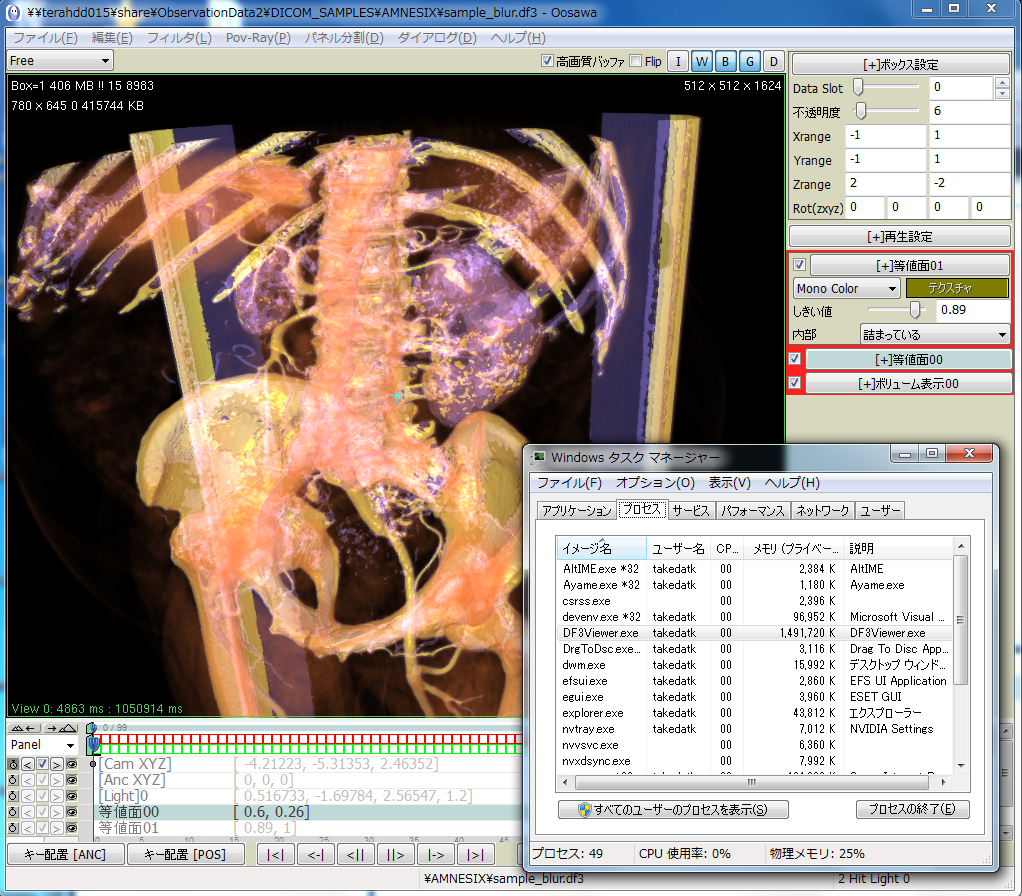
In the preview screen, the volume data is rendered with Video-card based 3D-Texture volume rendering.
Of course, you can make movies from the preview images in faster way.
blog(Japanese only)
more screenshots
Well, You want to visualize particle data?
FEATURES
Prefetching of time-lapse data for faster response.
Several data processings such as gamma control
Setting primitive objects such as cheker-board plane in the scene.
Handling larger data in octotree or nested grid format.
Stereo output for scan-line method and anaglyph.
Making isosurface and exporting it to Wavefront (.obj) format.
etc...
Testmovies . Gallary . Download . ReleaseNote
INSTALL
Time-lapse volume data requires much memory space, so that I strongly reccomend 2G Memory at least for 32bit OS, or larger for 64bit OS.
Also, Oosawa requires good video-card for the rendering. I reccomend a fast video-card with 1GB video memory or better.
To install Oosawa, unzip the package to any folder, and double-clicking DF3Viewer.exe would work.
At the end of session, Oosawa write down a configure file DF3ViewerConfigure.txt to the folder where DF3 Viwer.exe exists.
Thus, do not put Oosawa to the folder where you do not have the permission of the writing.
Oosawa does not write any information to the registory.
To Uninstall Oosawa, just remove the folder that contains the DF3Viewer.exe.
Unzip the package, and execute DF3ViewerGTK2X86.out or DF3ViewerGTK2amd64.out
In linux version, Oosawa uses wxWidget-gtk for GUI, so that wxWidget-gtk must be installed.
In ubuntu distribution, wxWidget-gtk can be installed by synaptic package manager.
Also, library for using OpenGL (such as freeglut3) is required.
Oosawa can export .pov file for Pov-Ray 3.6 or 3.7.
If you are using Pov-Ray 3.7, please use the newest version (RC5 or later).
In newest 3.7 version, some .pov format is changed from the older ones.
So that errors may occur if you use older Pov-Ray 3.7.
MANUAL
1. File
Open Data Open Data by Name
Export Save Image(s)
2. DataSlot
3. Main Panel and Side Panel
Preview Preference
4. TimeLine
Parameter Editing
5. Camera Path
View and Camera
6. Coloring
Custom Color
7. Filters
Filtering
8. Rendering by PovRay
Rendering Light Source Isosurface Texture

File
Rendering parameters and camerapathes can be saved as a project file (.osp)
Load a volume data.
Oosawa can read two types of volume data. Sequential z-stack images and .df3 file.
.df3 is volume format used by Pov-Ray. Note that Pov-Ray can handle volume data in .df3 format only.
Thus, if you want to make ray-traced image with Pov-Ray, you can make .df3 file aforehead.
Oosawa can export .df3 file(s) from after reading z-stack image sequences.
For very very long time-lapse data, which is divided to multiple folders, I made "Append Data file" menu.
Opening data with this method, new time-lapse date is appended to the end of the current data.
The loaded data is stored to the active dataslots.
Oosawa has four dataslots, and can read volume datas independently up to four.
Datailed Informations ->
If the time-lapse volume data is sequencetial .df3 files, it is easy to automaticcaly detect the format.
However, if the volume data is in z-stack sequential files, there is two sequence (t-sequence and z-sequence). Thus, information is required about which number is for time and which one is for z.
You can write down the t and z format with this dialog.
Detailed Informations ->

Oosawa can export volume date in .df3 format file(s), or z-stack image sequence (of current snap). If you apply some filter to the volume data, modified volume data would be exported.
Also, if isosurface filter exist, you can export wavefront .obj files (for major 3DCG softwares) or mesh2 format file (for Pov-Ray).
Detailed Informations ->
You can save a snapshot image(s) or time-lapse images of the preview. If multiple canvas are opened, the images of top-left canvas would be saved.
Datailed Informations->
"Copy snapshot" copies current preview image to clipboard;
Oosawa can handle up to 4 volume data.
Volume data is stored to data slots 0-3, and displayed according to the parameters configured independently.
The active dataslot is selected by tab selector.

Edit
Undo or Redo.
Change the current frame numerically.
Also, You can set the current frame numerically by text controls at Timeline Editor.
Change the size of data box automatically, assuming that the each boxel is cubic (x:y:z = 1:1:1).
Remove the stored data from the memory.
Open the "Scene Setting Dialog" too edit the scene length.
Open "Preference Dialog".
Enable or disable time-remap.
Without timeremap, the n-th frame of the scene is connected to the n-th timelapse data.
By time-remap function, you can edit the relation between the frames and the time.
With time remap, you can make slow-motion movies or time-reversed movies.

Filters
Add Filters to the active data slot. Note that objects like Volume and Isosurface are called Filter, as well as data processing like gamma correction.
See the section below for details of filters.
Most of property of filter is shown on the side panel. However, some filters have too many parameters to show all of them in side panel, and property dialog for advanced settings is prepared.
This menu opens a property dialog of selected Filter.

Pov-Ray
Exporting scene files for Pov-Ray is one of the main feature of Oosawa.
This menu opens "Pov-Ray Rendering Configure Dialog" to set properties about Pov-Ray rendering.
Opens "Advanced Povray Setting Dialog" for more detailed settings of Pov-Ray. Only for experienced users of Pov-Ray.
Exporting scene file makes scene files (.pov file and .ini file) for Pov-Ray. You must manually call Pov-Ray for render them. This is good for users who want to render by batch-shell script or some other mothods.
Calling Export and Render, Oosawa calls Pov-Ray for rendering scene files, according to the settings configured in "Pov-Ray Rendering Configure Dialog".
Panels
Oosawa can show upto 4 preview panels. You can change the number of panels with Panel menu.

Dialogs
Open following dialogs to configure parameters.
DataSlot
Oosawa can display multiple volume data. Data is loaded to the active slot, and you can handle display paprameters for individual slot.
Active slot is selected by tab selector.
MAIN PANEL AND SIDE PANEL
Main panel
The largest panel in default state is the preview panel, where the visualized images are shown.
By default a grid, a camera, a pivot (sky blue cross mark), and a light source are shown.
Preview panel can be splited up to 4 panels. You can change the number of panels with Panel menu.

Buttons [I][W][B][G][D] on the top-right side represents the visibility of,
[Items][Wireframe][Box][Grid][Data itself] respectively.
If [FBO] is checked, the rendering is drawn in 16bit-depth buffer, and then it is copied to the window (reduece to 8bit).
Using 16bit buffer, color banding would be reduced.
 The pull-down at top-left corner is a selector for the point of view.
"Free" view is default one, which you can navigate as described above.
"Cam0" is a view connected to the camera path. When you change the frames for timeline, the point of view automatically follows the camera path.
The pull-down at top-left corner is a selector for the point of view.
"Free" view is default one, which you can navigate as described above.
"Cam0" is a view connected to the camera path. When you change the frames for timeline, the point of view automatically follows the camera path.
Other modes are orthographical view alog the line of axis.
These views can be selected by short cut keys 0(Free), 1, 3, 7, and ctrl-1, ctrl-3, ctrl-7.

As for special mode, MEMO editor can be shown on panel.
This text have no effect to the rendering. The text is also saved to project file. Use this text as a memo.
Mouse configure
 You can rotate the scene as you are rolling "trackball". Rotation is assigned to left button of the mouse. The center of the rotation is the pivot.
Zooming is assigned to middle button and mouse wheel.
For a mouse without middle button, Alt + left mouse button works as if it were middle mouse button.
Panning is assigned to Shift+Ctrl+left mouse button. Note that when the preview panel is panned, the center of the rotation (pivot) also moves.
With shift + Mouse Left Button(MLB), you can handle objects such as light source and camera path.
When selecting keyframes at time line editor, (Shift + MLB) moves the key frames.
If no key is selected, (Shift + MLB) automatically set keyframe and moves that key.
To select an item, Shift + Mouse Right Button on the preview panel, or select it on the TimeLine editor.
When selecting a movable items, a guide (arrows) appears.
Clicking these arrows, you can move items along the X,Y,Z axis.
This constraint is canceled by [esc] key.

 Panning moves the location of the pivot.

Three icons at the right-bottom side represents translation, scaling, rotation mode.
Shortcut kyes [G] [S] [R] represents these mode respectively.
You can configure the mouse setting in Preference Dialog.

SIDE PANELS
SIDE PANELS
You can handle basic parameters of data box and Filter parameters at side panel.
You can stack several Filters on a single data slot.
For simplicity of panels, you can show/hide the contents of each panel with [+] buttons .
Parameters in this panel define the size of data box.
Details->
Parameters in this panel determine the way of playing animations.
Details->
Filters have two types of functions.
One is to show object like volume data or isosurface, and one is to process data like gamma correction.
Filters can be added from menu (main menu or popo up menu by right mouse button).
You must have at least one volume or isosurface filter to display volueme. Note that only one volume filter for each data slot is functional, and second volume filter is ignored.
Note that filters are applied to the date from a top to the bottom
.
If you set the object filters, such as "Volume" or "Isosurface" above the process filters like "Level" or "Gauss Blur", later filters would not be applied to the data which provied to the object filters.
Let object filters to be the bottom of process filters.
Preference dialog provide the access to the parameters concerning the mouse and memory performances.
You can access the dialog from the menu through Edit(E)->Preference(P) Ctrl-Alt-P.
Ditails of preference dialog->
Access to the parameters concerning the quality of preview is in preview property dialog as follows.
Preview dialog provides the access to the parameters concerning the quality and perforamance of preview.
Select Dialog(D)->Preview Property(P) Ctrl-P in the menu.
Details of preview property dialog->
Timeline Editor

Timeline feature is common in video editing software or 3DCG softwares.
Adopting Timeline editor, Oosawa can edit parameters, such as positions of camera or lightsource.
Also, when the objects to which your interest is in are moving arount the data box, it is good for reaserchers to make a movie which follows the moving object of interest.
The red line represents the current frame. You can control current frame and range of working area using the sliders.
With text control boxes at the left of main slider, you can set current frame numerically.
The slider at the uppermost line detemine the magnification factor of Timeline.
The colors in the next lines shows the frames that the data is already stored on the main memory (green) and GPU texture memory (red).
Details of Editing Parameter->
The buttons at the bottom control the time.
Currently, these buttons are shown by ascii text, but I think you can understand the meaning of the buttons. (They would be replaced by images in the future).
Details of Animation->
CAMERA PATH
 In free mode, you can move the view by mouse.
Trackball: Mouse left button.
Trackball (with innertia): Ctrl + Mouse left button.
Zooming: Alt + Mouse left button, or middle button.
Pannning: Ctrl+Alt + Mouse left button.
Item Selection: Shift + Mouse right button.
Move Selected Item: Shift + Mouse left button.
The mouse button mapping can be configured in Preference
Camerawork Edit
You can edit the position of camera and position of anchor indipendently. The camera automatically tracks the anchor.
When buttons "Set Key [Cam]" and "Set Key [Anc]" is pushed, the key frame would be set with current position of the view.
Details of Vie and Camera->
Coloring
 You can customize color map which depends on the density.
Details of Custom Color

You can define density and color separately by selecting "color by Slot-n" whe using color curve.
(Known problem: If you use this function, you must turn off volume rendering in the n-th data slot.
Otherwise, two functions with the same name would be output in .pov file.)


Coloring of preview and Pov-Ray rendered image have different tendency. In preview mode, the foreground volume hide the background volume according to its density value, regardless of its color. In Pov-Ray rendered image, hiding is calculated in RGB space separately.
Pov-Ray rendered image tends to be brighter than the preview.

Filters
You can configure rendering parameters, set objects, apply some effects on volume, by using filters.
You can add any numbers of filters from "Filter" menu. You must have at least one "Volume" filter or "Isosurface" filter to display volume data.
Multiple volume or isosurfaces can be displayed.
Details of Filter
Among commonly used filters like gauss blur, we implemented simple 3D morphology filters.
Details of Morphology filters
Also we implemented some filters about velocity fileld.
Details of Velocity filters
Stereogram
Oosawa can render stereogram images for left and right eyes.
You can render images separately, of make image for line-by-line format.
Details of Stereogram
Coorperation with Pov-Ray
 Oosawa can export Pov-Ray scene files (.pov and .ini files), or call Pov-Ray for rendering these files.
Select Pov-Ray(P)->Rendering Preference(R) Ctrl-R to fonfigure settings for Pov-Ray Rendering.
Rendering Preference->
Light Source

 Rendered with and without a light.
You can set multiple lights for ray tracing in Pov-Ray.
However, pseudo-shadowing works only for first light in previwing.
Setting scattring parameter, Pov-Ray calculate self shadowing in volumedata.
Note, the self shadowing is veryyyy heavy process.
If you set isosurfaces or other objects, put at least one light source.
Datailed Information ->
Isosurface
Oosawa can calculate isosurface from volume, and export isosurface as wavefront .obj file.


Detailed Information ->
Texture Settings
 You can edit texture of Isosurface and Objects. In preview windows, several features would be refrected, but most feartures like mirror or bumpmap works only in PovRay rendering.
Details of Texture Settings
Language file
Oosawa loads language file like
locale/ja/Oosawa.po
If somebody make .po files for other languages, multi-language can be achieved...
Include file
There exist many third-party include files for PovRay.
Oosawa can use some of them.
In order to use them when rendering, put include files at following pathes.
PovRay 3.7 for windows: My Documents/Pov-Ray/v3.7/include/
PovRay 3.7 for LINUX: /usr/local/share/povray-3.7/include
grasstex.inc
This include file make texure like grass field. Developed by Rune Skovbo Johansen.
http://runevision.com/3d/include/
Copy files to
YOUR_INCLUDE_PATH/grasstex/
glalaxy.inc
This include file make background image for space. Developed by Chris Colefax.
http://povrayinclude.wytraven.com/
Copy files to
YOUR_INCLUDE_PATH/galaxy/
TOMTREE.inc
This include file make tree object. Developed by Tom Aust.
http://www.aust-manufaktur.de/austtx.html
Copy files to
YOUR_INCLUDE_PATH/TomTree/
To use them, please rename several pathes in the include files to from TOMTREE.inc to TomTree/TOMTREE.inc, and so on.
I made some low quality sample objects for fast rendering. Copy them to the same folder.
LowQualityTemplateTree.zip
OCTOTREE AND NESTED GRID
Oosawa can partially handle simple octotree and nested grid data structure.
For example, if you have single 512x512x512 volume data, rendering time with Pov-Ray may be very long.
If you have eight 256x256x256 volume data, and singe low resolution file, Oosawa make a scene file according to the position of camera, i.e. if camera is far from the data, it uses low resolution file, while it uses high resolution file when camera is close to the data.
Details of Octotree and Nested grid->
I am sorry that this function works only in the Pov-Ray scene file. The preview shown in Oosawa only uses the root data with lowest resolution.
Download
Binary files for Windows (32 and 64bit packed)
Oosawa7p68.zipVer0.768
Oosawa7p70.zipVer0.770
Oosawa7p72.zipVer0.772
Oosawa7p74.zipVer0.774
Oosawa7p76.zipVer0.776
Oosawa7p78.zipVer0.778
Oosawa7p80.zipVer0.780
Oosawa7p90.zipVer0.790 newest
Binary files for LINUX
OosawaGTK2_7p60.zip Ver0.760 GTK2
OosawaGTK2_7p60.tar.gz Ver0.760 GTK2(tar.gz)
OosawaGTK2_7p62.zip Ver0.762 GTK2
OosawaGTK2_7p62.tar.gz Ver0.762 GTK2(tar.gz)
OosawaGTK2_7p64.zip Ver0.764 GTK2
OosawaGTK2_7p64.tar.gz Ver0.764 GTK2(tar.gz)
OosawaGTK2_7p66.zip Ver0.766 GTK2
OosawaGTK2_7p66.tar.gz Ver0.766 GTK2(tar.gz)
OosawaGTK2_7p68.zip Ver0.768 GTK2
OosawaGTK2_7p68.tar.gz Ver0.766 GTK2(tar.gz)
OosawaGTK2_7p72.zip Ver0.772 GTK2
OosawaGTK2_7p72.tar.gz Ver0.772 GTK2(tar.gz)
OosawaGTK2_7p74.zip Ver0.774 GTK2
OosawaGTK2_7p74.tar.gz Ver0.774 GTK2(tar.gz)
OosawaGTK2_7p76.zip Ver0.776 GTK2
OosawaGTK2_7p76.tar.gz Ver0.776 GTK2(tar.gz)
OosawaGTK2_7p78.zip Ver0.778 GTK2 newest
OosawaGTK2_7p78.tar.gz Ver0.778 GTK2(tar.gz) newest
Linux version requires libwxgtk-2.8 package. If you use ubuntu or other debian-based linux, do
apt-get install libwxgtk2.8-0
The another necessary package libwxbase2.8-0 would be installed automatically.
Of course, driver for openGL is required, such as freeglut3.
Source
DF3ViewerSRC7p45.zip Ver0.745 Source (VC++2012)
DF3ViewerSRC7p60.zip Ver0.760 Source (VC++2013)
Since libray path for wxWidgets in my PC is not default path, you can rewrite include path or library path when compiling.
Also, you must rewrite include pathes in makefile.ini for LINUX.
■ Known Problem
Segmentation fault when isosurface data is too large.
Memory information in about box with 32bit Linux version is incorrect.
Scrolling with wxScrolledWindow in LINUX version is something wrong.
...

 In free mode, you can move the view by mouse.
 Rendered with and without a light.
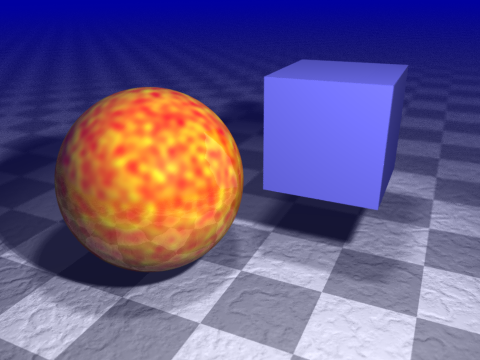 You can edit texture of Isosurface and Objects. In preview windows, several features would be refrected, but most feartures like mirror or bumpmap works only in PovRay rendering.